المدة الزمنية 20:26
How to host Flask API/Application using ngrok temporarily | macOS tutorial
تم نشره في 2023/03/17
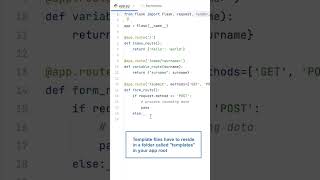
Can you help me to buy a coffee: https://www.buymeacoffee.com/coffeeprogram Previous video: /watch/IWW68QqrHI6r6 Homebrew: https://brew.sh /bin/bash -c "$(curl -fsSL https://raw.githubusercontent.com/Homebrew/install/HEAD/install.sh) " ngrok download: https://ngrok.com/download brew install ngrok/ngrok/ngrok ngrok config add-authtoken your_token ngrok http 4000 from flask import Flask, jsonify, request app = Flask(__name__) @app.route("/") def hello(): return jsonify({"message": "Hello World"}) @app.route("/submit", methods=['POST']) def submit(): request_data = request.get_json() user_data = request_data["name"] final = "Hello "+user_data+". How can i help you" return jsonify({'response':final}) if __name__ == '__main__': app.run(port=4000) In this tutorial, you'll learn how to create your first Python Flask API and use ngrok to temporarily host your application. Whether you're a beginner or just looking to get started with Flask and ngrok, this tutorial will guide you through the entire process step-by-step on macOS. With Flask, you can quickly build web applications and APIs, and ngrok allows you to temporarily host your app on a public URL for easy testing and sharing. So let's get started! "Instantly share your Python Flask API with the world using Ngrok" "Hosting your Flask app has never been easier with Ngrok" "Expose your Python Flask API to the internet with Ngrok in minutes" "Try Ngrok to share your Python Flask app with clients and stakeholders" "The ultimate guide to using Ngrok for temporary Flask app hosting"
الفئة
عرض المزيد


تعليقات - 1
مقاطع الفيديو ذات الصلة على How to host Flask API/Application using ngrok temporarily | macOS tutorial:


![[WEB DEVELOPMENT HACKS] Emails in Flask | Tutorial by Mailtrap](https://i.ytimg.com/vi/Haz_-0f_6l4/mqdefault.jpg)